
Setting up an inverted phase contrast microscope for tissue culture
“Often microscope users are unaware of how to set up an inverted microscope and either suffer from low quality images or adopt a trial and error approach to try to improve results. Understanding how to set up the microscope properly can save time and greatly increase the quality of images and data generated from cell cultures”
~
In most conventional cell culture cells grow attached to the inside of a petri dish or tissue culture flask. In order to see the cells we need in inverted microscope where the objective is underneath the stage of the microscope and points upwards so that the specimen can be viewed from below. Light is directed onto the specimen through a series of condenser lenses from above.
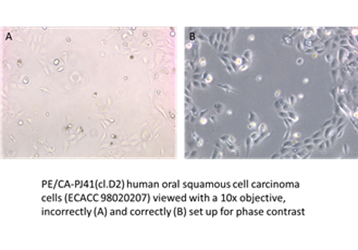
Cells in culture are colourless, transparent and difficult to distinguish from their surroundings by conventional bright field microscopy. Phase Contrast microscopy was developed in the early 20th Century by the Dutch physicist Fritz Zernike. Zernike discovered that if rings are placed in the condenser and the objective of a microscope and correctly aligned, interference patterns can be generated in sample that result in a phase shift in the wavelength of the light reaching the eye, enhancing the image considerably. The technique was recognised as a major advance in microscopy and Zernike was awarded the Nobel Prize for his work in 1953.
Often microscope users are unaware of how to set up an inverted microscope and either suffer from low quality images or adopt a trial an error approach to try to improve results. Understanding how to set up the microscope properly can save time and greatly increase the quality of images and data generated from cell cultures.
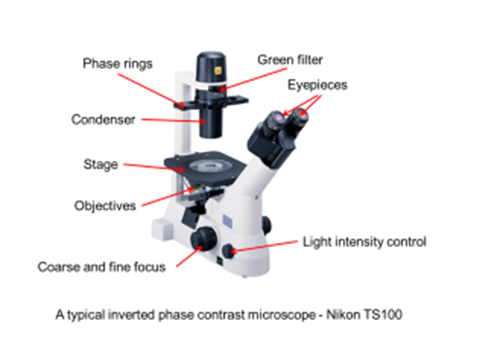
First, check you have specialised phase contrast objectives. This should be clear, by for example, the word “phase” being printed on the objective body. Secondly, there should be set of annulus inserts (sometimes called phase rings) present in the condenser. These are usually made of metal and should be matt back in colour to help them absorb unwanted light. If the black coating has worn off then the microscope may not work optimally. The phase rings may also have adjustment screws to allow the rings to be moved into optimal alignment. There should be specific rings for specific objective magnifications.
Set the microscope to bright field (no phase rings in place) and focus on the cells, when focused the best you can, alter the brightness of the illumination and the height of the condenser for optimal image quality, then select the correct phase ring for the objective being used. Note there may be adjustment screws that allow the condenser to be properly centred. Use these to ensure the sample is correctly illuminated.
You may have a “phase telescope” specific to your microscope. If so, remove one of the eyepieces from the microscope and place the telescope in its place. If there are adjusting screws for the phase ring alignment, adjust them so that the image of the ring is in exact alignment with the ring in the objective. Once these are aligned they should not require re-adjusting for some time.
You may also notice the option for placing a green filter into the condenser. In practice phase-contrast works over the entire spectrum of visible light, however, the phase optics will be manufactured to operate at an optimal wavelength of 550nm, as the human eye is most sensitive to green light. Use of a green filter, therefore, provides optimum contrast.
Finally the iris diaphragm can be used to adjust the area of the sample being illuminated, this allows the shielding of excess light and helps you acquire and image of good contrast.